Tuesday, December 30, 2008

TWD: Tall and Creamy Cheesecake and an announcement

Hi everyone, I'm back! Sorry for the unannounced (and unanticipated) blogging vacation. I sure hope all of you had a wonderful Christmas - we sure did. It wasn't exactly peaceful (that's an impossibility with four children) but it certainly was joyful.

I have made my fair share of cheesecakes and even made some to sell this holiday season - and that's what I did with this one. A friend ordered a cheesecake for her family Christmas celebration this past Saturday, which was perfect timing for this week's TWD post. I have a couple of very good recipes from epicurious.com that I most frequently use. In fact, I used the topping from this one to create the cheesecake I made for my friend - Cranberry Orange Cheesecake with a Chocolate Crust.

Dorie's recipe comes together very easily, like most cheesecakes. I'm not sure why people find the prospect of making a cheesecake daunting, because, really it's pretty easy - the trickiest part is the water bath and I'm going to tell you the secret right now. When you're wrapping your springform pan in foil to go into the water bath, you must use the large heavy duty foil (18 inches wide). If you use anything smaller, the water will seep into the pan and turn your crust into mush (I speak from experience here). Wrap the pan at least twice, making sure to mold each foil layer upwards towards the top of the pan (not folding it sideways) - you may have to roll the top of the foil around the top edge.


Another tip: when you fill your roasting pan, make sure to put the pan in first, then fill it with hot water (no more than halfway up the side of the pan).


To make a chocolate crust, I just used 1 3/4 cups of crushed oreos (stuff removed - this is much to the delight of my children who make super stuffed oreos).


You can buy plain chocolate wafer cookies - Meijer doesn't carry them here though and they're usually more expensive than oreos (plus, no stuff). Anyway, I omitted the additional sugar and just stirred in the melted butter.

The only other change I made to the original recipe was to add 2 tsp. grated orange zest to the batter and add the topping. Here's that recipe:

1/2 cup sugar
3 tablespoons water
1 teaspoon cornstarch dissolved in 1 tablespoon water
2 cups fresh cranberries
1/2 teaspoon grated orange peel

Stir sugar and water in medium saucepan over medium-low heat until sugar dissolves. Increase heat to medium; add cornstarch mixture and bring to simmer. Add cranberries; cook until beginning to pop, stirring often, about 3 minutes. Stir in orange peel. Cool completely. Cover and chill overnight. (Cheesecake and cranberry mixture can be made 2 days ahead. Keep refrigerated.)

Run knife around top edge of cheesecake to loosen. Release pan sides. Top cheesecake with cranberry mixture. Chill until set, about 1 hour.

My announcement is sort of a sad one to make - this will be my last Tuesdays with Dorie post. Unfortunately, Dorie's baked goods aren't calorie free and I really want to focus on losing 30 pounds next year. I thought that training for a half marathon would do the trick, but alas, no. At least I didn't gain any weight! I have had such a great time since I joined and I am so thankful for all my new blogging friends I met through TWD.

In 2009 I am going to try to post healthy recipes which will be lower in fat and sugar, but every once in a while, I'm going to have to sneak in something truly decadent (and there's really not many better sources out there than Baking From My Home to Yours by Dorie). Thanks to all my TWD buddies for all your support and I'll be sure to check in with you each Tuesday!

Have a happy and safe New Year!
UPDATE: It's been too long since I last posted a TWD - I completely forgot to link to the wonderful blogger who choose this week's recipe. Please visit Anne of Annestrawberry for the recipe and to check out a truly fantastic blog!

Tuesday, December 9, 2008

TWD: Grandma’s All-Occasion Sugar Cookies

Please accept my apologies for the light blogging lately. Like all of you, we are busy, busy, busy right now and blogging has sort of taken a back seat. So, sorry - I am hoping that I'll be able to get back into the swing of things after the holidays (and then after a short break for the Disney half marathon and vacation in January).


These cookies are a snap to make and are a good all-around sugar cookie. They are a little on the crisp side, but if you watch them really carefully and take them out just before they start to brown, you can have them a little crisp on the outside and chewy on the inside (which seems to be just the right texture to me). I have to admit that they don't quite measure up to my all-time favorite sugar cookie recipe though - Cream Cheese Icebox Cookies from the Joy of Cooking. These are simply outstanding - the dough is great to work with and the addition of the cream cheese just makes them taste fantastic. I also usually use the Quick White Icing II recipe from the same book and it's always a hit (watch this very carefully as it heats - don't overheat it or it'll crystallize on you). Since this was the kids' chance to get in touch with their inner artist (and taste isn't a huge factor), I went with Betty Crocker's icing bags this time.


I let the kids go to town with the frosting and sprinkles. Isn't it amazing how children have the ability to cover almost every square millimeter of the top of the cookie with stuff - that my friends, is pure kid talent. This is my three year old's creation:


For Dorie's recipe, check out the Küchenlatein blog (I think it's German, but she's got a translator function) - thanks Ulrike for choosing this week's recipe and giving my kids the opportunity to make a pretty good sized mess and get a nice sugar rush all in the span on 15 minutes :-) As usual, you can check out all the other supremely talented TWD bloggers here.

Tuesday, December 2, 2008

TWD: Linzer Sables


It's the most wonderful time of the year again folks! Welcome to the Christmas season - well, actually according to Catholic tradition, it's only Advent, and Christmas is from Dec. 25th through Jan. 5th, but I digress.... Anyway, Tuesdays with Dorie starts off the season with, what else, cookies! They're beautiful cookies too - or they could be if you remember to make a cutout in the center of the cookie (making a window into the delightful raspberry jam filling). As you can see, I completely forgot to do this, but I still think they're pretty. And feel free to judge this book by it's cover - they're delicious!

The recipe is very easy - don't be intimidated by rolling out the dough. It rolled out like a dream and, since you roll it between two sheets of plastic wrap, clean up is a cinch. I only made one change to this recipe and that's to substitute 1 can of almond paste for the ground almonds and sugar. I thought I had plenty of almonds stored away in the freezer and only at the last minute realized I didn't have any. Thankfully, I had bought a can of the almond paste a couple of months ago intending to make another batch of almond horns (still intending to do that - maybe later this month). This substitution worked great, but I had to rearrange the directions a little to compensate, so I'm reprinting the recipe with my changes.

Linzer Sables
adapted from Baking From My Home to Yours by Dorie Greenspan

1 8 oz. can Almond Paste
1 1/2 cups flour
1 1/2 tsps ground cinnamon
1/4 tsp salt
scant 1/4 tsp ground cloves
1 large egg 2 tsp water
1 stick unsalted butter, room temperature
1/2 cup raspberry jam

Working with a stand mixer fitted with the paddle attachment, blend almond paste and butter together until smooth, maybe 3 minutes at medium-low speed, scraping down the sides as needed. Reduce speed to low and add in the ground cinnamon, cloves and salt. Add in the egg and water, beat another 2 minutes. Add the flour, mixing only until just combined - don't over mix.

Divide the dough in half. Working with one half at a time, put the dough between two large sheets of plastic wrap. Using your hands, flatten the dough into a disk, then grab a rolling pin and roll out the dough, turning it over frequently so the paper doesn't cut into it (I did not do this and it wasn't a problem - I used plastic wrap though) until it is about 1/4 inch thick. Leave the dough in the paper and repeat with the second half of the dough. Transfer wrapped dough to a baking sheet and refrigerate or freeze until it is very firm, about 2 hours in the fridge or about 45 minutes in the freezer. The rolled-out dough can be wrapped airtight and stored in the refrigerator for up to 3 days or in the freezer for up to 2 months. Just thaw the dough enough to cut out the cookies and go on from there.


Getting Ready to Bake: Center a rack in the oven and preheat to 375°. Line 2 baking sheets with parchment or silicone mats.

Peel off the top sheet of wax paper or plastic wrap from one piece of dough and, using a 2-inch round cookie cutter - a scalloped cutter is nice for these - cut out as many cookies as you can. If you want a peekaboo cutout, use the end of a piping tip to cut out a very small circle from the centers of half the cookies. Transfer the rounds to the baking sheets, leaving a little space between the cookies. Repeat with second disk of dough. Set the scarps aside - you can combine them with the scraps from the second disk and roll and cut more cookies (refrigerate the rolled out disk as before).

Bake the cookies one sheet at a time (I didn't - I put them both in the oven and switched them halfway through baking and they came out great) for 11 to 13 minutes, or until the cookies are lightly golden, dry and just firm to the touch. Transfer to a rack to cool to room temperature.

To make sandwich cookies, spread jam on one side of the cookies and top with another cookie. Dorie's recipe is a little different her in that she melts the jam with some water and boils it slightly, but again, mine came out fine just using the straight jam. One final note, the recipe says it makes 50 cookies (or 25 sandwich cookies) - I didn't even come close to that as I only got about 16, but I don't think I rolled out my dough as thin as a quarter of an inch either.

I definitely recommend this cookie and think it'll look great in your holiday assortment, especially if you use a Christmas themed cookie cutter. I tried using my star-shaped cutter, but the tips kept breaking off so, in order to keep my stress level down and avoid that Mommy's-really-irritated-so-don't-mess-with-her atmosphere in the kitchen, I went with the scalloped edge cutter. (My kids know first hand that expression "If Mama ain't happy, ain't nobody happy" and have started to recognize the warning signs)


Many thanks to noskos of Living the Life for selecting a cookie that's as beautiful as it is tasty (you can find the original recipe there)! Like I said, I don't know if I'd classify my Linzer Sables as beautiful, but not bad. Dorie's are in the book and I'm sure plenty of other TWD bakers' have gorgeous cookies - so check 'em out!

Coming up next Tuesday: Grandma’s All-Occasion Sugar Cookies (we'll be breaking out the Christmas sprinkles for sure!)


Thursday, November 27, 2008

Barefoot Bloggers - Mexican Chicken Soup


I have to be honest - I wasn't all that crazy about making this soup and then having to post it on Thanksgiving of all days, but actually I really liked it. Judy from Judy’s Gross Eats selected this week's recipe and I thankful she did because I probably would have never tried it on my own (a common theme with my Barefoot Bloggers experience so far). The kids didn't really think it was all that great, but this really isn't the kind of soup that's going to please the under 12 crowd anyway. But, if you're in any age group above that, you should give this soup a try - I'm sure you'll be pleasantly surprised!

Here are my changes:
  • I took a major shortcut and used a roasted chicken from Sams and just shredded it - worked great and only cost me $4.88!
  • Used store bought chicken stock
  • Omitted the jalepenos - kiddos don't like anything even remotely spicy
  • Omitted the ground coriander seeds and just used 1/2 cup of cilantro
Mexican Chicken Soup
from Barefoot Contessa at Home
yield 6 - 8 servings

4 split (2 whole) chicken breasts, bone in, skin on
Good olive oil
Kosher salt and freshly ground black pepper
2 cups chopped onions (2 onions)
1 cup chopped celery (2 stalks)
2 cups chopped carrots (4 carrots)
4 large cloves garlic, chopped
2 1/2 quarts chicken stock, preferably homemade
1 (28-ounce) can whole tomatoes in puree, crushed
2 to 4 jalapeno peppers, seeded and minced
1 teaspoon ground cumin
1 teaspoon ground coriander seed
1/4 to 1/2 cup chopped fresh cilantro leaves, optional
6 (6-inch) fresh white corn tortillas
For serving: sliced avocado, sour cream, grated Cheddar cheese, and tortilla chips
Preheat the oven to 350 degrees F.
Place the chicken breasts skin side up on a sheet pan. Rub with olive oil, sprinkle with salt and pepper, and roast for 35 to 40 minutes, until done. When the chicken is cool enough to handle, discard the skin and bones, and shred the meat. Cover and set aside.

Meanwhile, heat 3 tablespoons of olive oil in a large pot or Dutch oven. Add the onions, celery, and carrots and cook over medium-low heat for 10 minutes, or until the onions start to brown.


Add the garlic and cook for 30 seconds. Add the chicken stock, tomatoes with their puree, jalapenos, cumin, coriander, 1 tablespoon salt (depending on the saltiness of the chicken stock), 1 teaspoon pepper, and the cilantro, if using. Cut the tortillas in 1/2, then cut them crosswise into 1/2-inch strips and add to the soup. Bring the soup to a boil, then lower the heat and simmer for 25 minutes. Add the shredded chicken and season to taste.

Serve the soup hot topped with sliced avocado, a dollop of sour cream, grated Cheddar cheese, and broken tortilla chips.

You can find the list of all the other Barefoot Bloggers here.
Have a wonderful Thanksgiving everyone!

Tuesday, November 25, 2008

TWD: Thanksgiving Twofer Pie

If you're short on time this Thanksgiving (and really, who isn't), this pie may be just the thing for you - two pies for the price of one! This week's recipe was selected by Vibi of La casserole carrée (another French-Canadian blog! Don't worry about trying to read it with your high-school-French-class-only-level French language abilities, she's got Google Translate) - thanks for choosing such a perfect recipe for this week Vibi!

It's very easy to put together, especially if you buy a Pillsbury ready to use pie crust. Yep, that's right - I pulled a Sandra Lee and I used a store-bought pie crusts to make my "semi-homemade" twofer pies. For those of you who know me, you know what a monumental announcement this is - I never, ever, under almost any circumstance use refrigerated pie dough. You see, I am a bit particular when it comes to pie crusts because they are my favorite part of the pie. My husband calls me a food snob, whatever. I prefer to think of myself as highly selective - I just know what I like, and homemade pie crust is, IMHO the only way to go. With a single exception - time. Or, more specifically, the lack there of. I don't mean to keep harping on this, because I know everyone is busy, but (as usual) I have over-committed and have just simply started to run out of time. I think I have the word "sucker" tattooed across my forehead, so please do me a favor and don't ask me to sign up to help with anything because I am just incapable of saying no.

At any rate, I ended up making two of these twofer pies for my church bake sale a week or so ago. Unfortunately, this meant that I personally don't know how they tasted, but I was told that they sold right away and the Women's Club earned some money for them, so I'm happy with that. I sure hope whoever bought them enjoyed them!
Here's my little 3 year old helping with the pumpkin pie part of the recipe (as a side note - don't you love all that stuff all over the counter - I'm surprised I found room for the dang food processor!).


The recipe calls for mixing the ingredients for the pecan pie filling together, then spinkling the pecans on the pumpkin layer already in the pie pan and then pouring the filling on last. I messed up and mixed the pecans in with the filling and just spread it over the pumkin - turned out just fine.


The final product:

Can't wait to hear how the other TWD bakers liked this pie - you can check them out here.

Lots and lots of cookies are scheduled for next month, including Linzer Sables which are on tap for next Tuesday!

Tuesday, November 18, 2008

TWD: Arborio Rice Pudding, Black, White (or both)


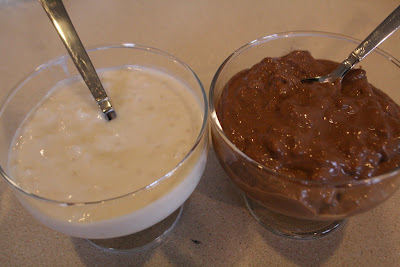
I chose the "both option" since I knew I was going to have to double the recipe anyway to satisfy my family of sweet-tooths. I was eagerly anticipating this recipe because I haven't ever made rice pudding, and hadn't even eaten it since I was oh, about twelve years old. My Mom made it for us occasionally when we were growing up, but I haven't had the opportunity to have it since. On the surface, this recipe looks extremely easy, with only a handful of ingredients even if you include the chocolate. But, as I'm sure you are aware, looks can be deceiving.

I made one change from the recipe because I wanted to and another change because I had to. For the first, I decided that I would make the "white" part white chocolate as opposed to just a simple vanilla. I was frankly surprised that this wasn't what Dorie had originally in mind when she wrote this recipe (just seemed to make sense in that the "black" part was to be chocolate). As for the necessary change, read on.

When I read over the recipe, the thought of only using a measly 1/4 cup of rice to 3 1/4 cups of milk was unsettling. I wondered if it might be a misprint, but I went ahead and trusted that Dorie knew what she was talking about. I wish I had read the comments over at the Tuesdays with Dorie site first (I will remember to do that from now on as it is always full of great advice). Suffice to say, my pudding didn't quite come out right.

The recipe says to parboil the rice for 10 minutes and then cook it in the milk and sugar mixture for 30 minutes until 80-90% of the milk had been absorbed. After 30 minutes of simmering, it tasted delicious but looked nothing like rice pudding and everything like rice soup. The rice was tender and I just thought there was no way it was going to soak up that much milk. I added white chocolate to half and bittersweet to the other half and covered them with the skin-preventing plastic wrap. By this point, it was getting late so just I threw it in the fridge for an overnight stint and hoped fervently that things would set up. Alas, this was not the case. In the morning I simply had cold rice soup.


By now, you'd think that I would have remembered to go to the TWD site to figure out what was going on, but no, I didn't. My necessary recipe change was to put each batch back into a pot and add some cornstarch (2 tbsp per pot) to thicken them (bring to a boil and cook for an additional minute). This worked like a charm but kind of diluted the flavor. Of course, it was after this additional step that I consulted my fellow TWD bakers and discovered what I did wrong. Although the recipe calls for 30 minutes of simmering, many others found that if allowed to simmer another 15 to 30 minutes more, the pudding thickened nicely.


All in all, I have to say that this rice pudding was pretty tasty, despite my doctoring with the cornstarch. The white chocolate was far and away my favorite of the two and I'll definitely be making it again and next time, I'll try to be more patient. Thanks Isabelle of Les gourmandises d’Isa (a French food blog - oh, la, la tres magnific!) for choosing this delicious recipe. Check out the other TWD bakers here.

Be sure to check in next week for Thanksgiving Twofer Pie!

Thursday, November 13, 2008

Barefoot Bloggers - Herb Roasted Onions


Bless you Kelly (of Baking with the Boys) for selecting such a delicious and, most importantly, easy recipe for us today! I don't know about the rest of you, but I am just flying by the seat of my pants right now because time is moving at light speed (I know, I know - scientifically, that makes no sense, but you know what I mean). So, of course, I just prepared this dish last night at 8 pm knowing full well I wasn't going to really enjoy them until the next day. But, enjoy them I will. The husband is coming home tonight from a business trip and will be here by dinner - I am planning on preparing a wonderful steak and serving these roasted onions on the side. I can hardly wait, the aroma these made while roasting was just amazing and the small sample I tried right after they were done was really delicious.


I halved this recipe and only made one substitution - I used dried thyme instead of fresh (the selection at Meijer was terrible!)


Herb Roasted Onions
from Barefoot Contessa at Home
2 red onions
1 yellow onion
2 tablespoons freshly squeezed lemon juice
1 teaspoon Dijon mustard
1 teaspoon minced garlic
1/2 tablespoon minced fresh thyme leaves
3/4 teaspoon kosher salt
1/4 teaspoon freshly ground black pepper
1/4 cup good olive oil
1/2 tablespoon minced fresh parsley leaves

Preheat the oven to 400 degrees F.

Remove the stem end of each onion and carefully slice off the brown part of the root end, leaving the root intact. Peel the onion. Stand each onion root end up on a cutting board and cut the onion in wedges through the root. Place the wedges in a bowl.

For the dressing, combine the lemon juice, mustard, garlic, thyme, salt, and pepper in a large bowl. Slowly whisk in the olive oil. Pour the dressing over the onions and toss well.
With a slotted spoon, transfer the onions to a sheet pan, reserving the vinaigrette that remains in the bowl. Bake the onions for 30 to 45 minutes, until tender and browned. Toss the onions once during cooking. Remove from the oven, and drizzle with the reserved dressing. Sprinkle with parsley, season to taste and serve warm or at room temperature.


Again, great choice Kelly! Be sure to check out the other Barefoot Bloggers here.

Coming up for November 27th is Mexican Chicken Soup. Yep, Mexican soup on Thanksgiving - go figure (and no, of course I won't be serving it that day - I'll be making it well before then and just posting it that day).

Tuesday, November 11, 2008

Back to food blogging! TWD: Kugelhopf

I was intrigued when I first read that Kugelhopf would be our recipe this week - sounds really different, doesn't it? Really, it's just a kind of brioche (egg and butter, mildly sweet bread) and, well, to be totally honest, I didn't really think a whole lot of it after the taste test. It was good, but nothing to write home about, especially for all the steps involved in making it. Boy, I feel terrible writing that. It makes me wonder if I didn't do something right - which, after looking at it once it came out of the oven, makes that possibility more likely (note the concave bottom of those slices).

Anyway, here's how it came together:

The dough after the first addition of liquid (warm milk and yeast).


Yeah, that's exactly what I thought: "Huh? What the heck is that?" Dorie describes this look of the dough "shaggy". I've made quite a bit of bread but that was a new one for me, but that's a pretty accurate description.

After the addition of the eggs and butter however, the dough got very smooth and was actually pretty wet.


The boys had fun helping me out with this recipe (well eyeing the potential goodness, anyway), especially my littlest one - he really enjoyed watching my not-so-sturdy old Kitchen Aid work so hard to mix the dough.

Here he is helping to hold that crazy thing down! At any speed above 3, it really starts to wobble and kinda inches its way all over the counter.


My blogging friend Cathy over at The Tortefeasor is asking for kitchen goodies from Santa, I think I need to hop on that bandwagon too! Surely the big guy reads blogs - right Cathy?

I went looking for a Kugelhopf pan at our kitchen store in the mall and they didn't have one. So, not wanting to drag a tired 15 month old over to Bed Bath and Beyond, I just used the standby bundt pan (don't read anything into that Santa - just the new mixer would be great!).

After refrigerating the dough overnight, it actually rose faster than I expected - only two hours, but that was in a slightly warmed oven.


And, ta da - here's how it looked fresh out of the oven. Yeah, not quite right. Not sure what I did wrong, but Dorie says that the dough might rise up over the top of the pan once in the oven, but obviously, that wasn't a problem for my little Kugelhopf.


It looked much better unmolded with a fine dusting of powdered sugar:

So bottom line, if I were to make this again, which is doubtful, I would skip a lot of those middle rises and just do one rise overnight in the fridge, cook it in the morning and serve it at a brunch. You can find the recipe over at The All-Purpose Girl (thanks, Yolanda - I hope yours turned out better than mine!) and you can check out all the other fabulous Tuesdays with Dorie bakers here.

Next week's recipe sounds equally intriguing, but I'm hoping for better results: Black, White (or both) Arborio Rice Pudding

Sunday, November 9, 2008

Twilight Mania

Okay, will this Twilight madness ever end? It's everywhere! Once I started reading the first book, I just couldn't stop. And now I'm reading them again to get ready for the movie. My husband thinks I'm just a little too gaga over Edward. What he just doesn't seem to understand is that he is my Edward - love you dear {{{kiss}}}}

I just found this at Real Mom Kitchen and immediately had to find out which character I was (though I knew I wasn't going to be Bella):

I'm a Esme! I found out through TwilightersAnonymous.com. Which Twilight Female Are You? Take the quiz and find out!
Take the Quiz and Share Your Results!


So I'm Esme and I'm happy with that (I'm definitely the mother hen type). Have fun finding out who you are. And for those of you who haven't read the books, for your families' sakes, please don't until maybe after Christmas. The mania that ensues is inescapable.

Friday, November 7, 2008

It's a happy Friday!


Happy Friday everyone! I got this blog award the other day from a wonderful blogger - Sihan of Fundamentally Flawed {{{{hugs}}}}
So here's what the deal is: apparently, I've got to answer these questions (nothing like making accepting this blog award a little challenging, sheesh!).
7 Things I say most often:
  1. Knock it off!
  2. Stop whacking your sister with that _______ (most often a pint-sized broom)
  3. Practice piano!
  4. You all need to go outside and play. Now.
  5. You've got to be kidding me.
  6. I'm counting to three. One...Two.....
  7. Hurry up, we're going to be late!
7 things I did before
  1. Got 8 hours of sleep consistently. I can't remember anything else (sleep deprivation wrecks havoc on the brain).

7 things I do now (I'm assuming that most people don't want to hear about diapers and laundry, but there's not much else going on right now....this may be a short list)

  1. Teach 5th grade Sunday School
  2. Read what I like to call "brain-candy" books (no time or energy for heavy stuff) - the Twilight Saga is my current obsession.
  3. Training to do the Disney Half Marathon in January (only 9 very short weeks away - yikes!)
  4. Dream about escaping with my husband to somewhere warm and tropical

7 Things I want to do

  1. See number 4 from above.
  2. Go back to school to get my Masters Degree (in what, I have no idea)
  3. Learn to crochet
  4. Get back into Scrapbooking
  5. Own a business (again, no idea what)
  6. Keep my house clean for more than 5 minutes
  7. did I mention I want a vacation?

7 that attract me to the opposite sex

  1. Sense of humor
  2. Has to be taller than I am
  3. Intelligent
  4. Honesty
  5. Loyalty
  6. Enjoys playing with kids
  7. Nice pecs doesn't hurt

7 favorite foods

  1. My Mom's Lasagna
  2. Spinach and artichoke dip
  3. Pound cake
  4. Chicago-style pizza (How did I ever live without it before I moved to Illinois???)
  5. Pistachio ice cream
  6. Pecan Pie
  7. Prime Rib with Yorkshire Pudding (our annual Christmas dinner)

7 Blogs I want to pass this award on to. These are all fantastic blogs that I've recently discovered and will revisit frequently! I know you will enjoy them, too.

  1. Pantry Revisited
  2. Everyday Cookin'
  3. Sticky, Gooey, Creamy, Chewy
  4. Nummy Kitchen
  5. The Food Librarian
  6. Living in the kitchen with Puppies
  7. Baking and Boys

Have fun playing along bloggers!

Tuesday, November 4, 2008

TWD: Rugelach - better late than never

Just a quick post today. As usual, I waited until the last minute to make these and ran into family issues last night while waiting for the dough to chill. My 10 year had to make amends with her best friend and so we pulled out the Easy-Bake oven, made her a sugar cookie and my daughter and I delivered it (with a long note of apology). Problem solved, best friends again, all is right with the world.


So we rescued the friendship, but I didn't get around to finishing the Rugelach until today.


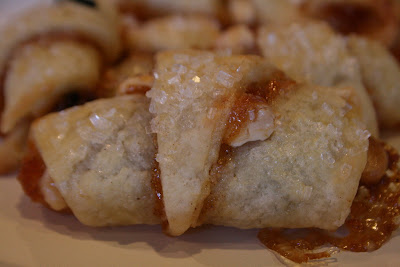
I used apricot preserves, dried cherries and white chocolate chips to make these and the flavors came together beautifully. In the recipe, Dorie suggests cutting the rolled out dough into 4 squares and cutting those into triangles. I just ended up cutting it up like a pizza and ended up with 12 slices for each round of dough - so only 24 cookies. I didn't think these were extra large, but maybe my eyes, and tummy, like the bigger size (I'm guessing my hips won't like these larger rugelach though :-)


I was successful in stowing these in the freezer (except for the one I had for purely R&D purposes, of course) and plan on pulling them out for Christmas. Check out Piggy's Cooking Journal for the recipe and be sure to check on all the other TWD bakers here.

Thursday, October 30, 2008

Creme Brulee Cheesecake - yes, it's as good as it sounds


First, an apology. I don't have very many photos and the ones I do have are pretty crappy. The picture above is one someone else took of the entire table as we were still getting everything ready and I just cropped it - don't you just love that big box of crackers right behind the cake?! And it really was much prettier when you looked at it closer - the caramelized sugar was nice and twinkly.


I made this cheesecake a couple of weeks ago when I threw a surprise party for one of my very best friends. I was so preoccupied with keeping the whole shebang a secret and getting everything else ready, I forgot to snap pictures both as I made it and after it was all done. She's one of those people for whom it's practically impossible to either a) find a day that will work because she's so busy and/or b) genuinely surprise - miraculously, I was able to do both. This is her piece (after I finally remembered to take a picture):


I've only ever had Creme Brulee Cheesecake one time, but from that first forkful, I was smitten. It was a frozen one from Sam's Club, but I thought that someday I must try to duplicate it. After making Creme Brulee for the first time a few weeks ago, I knew that the time to try was at hand. So, thanks to some inspiration from Dorie, here's the recipe (should be prepared the day before you're going to serve it):


Creme Brulee Cheesecake

For the crust:
About 2/3 of a 16 ounce package shortbread cookies
3 Tablespoons melted butter

For the filling:

4 8 ounce packages low-fat cream cheese, room temperature
1 tablespoon flour
1 1/2 cups sugar, divided
1 tablespoon vanilla extract
3 large eggs, room temperature
3 large egg yolks, room temperature
1 cup heavy cream
granulated sugar for topping (I used about 1/3 cup - you don't want too thick a layer of sugar 'cause it would be a real pain to cut through and really mangle the slices)

Preheat oven to 350 °. Wrap the outside of a 10-inch diameter springform pan (you could use a 9 inch pan, just cook it for a while longer, maybe 15-20 minutes) with at least 2 layers of aluminum foil. Make sure this is the large heavy duty foil so that the width of the foil exceeds the diameter and height of your pan - this will help prevent water from leaking into your cheesecake (trust my experience here, watery cheesecake = nasty mess). When you fold the foil over the sides of your pan, try to make sure you press the foil up and not to the sides of the pan.

Prepare the crust. Finely grind shortbread cookies in a food processor. Add melted butter and process until crumbs are moistened. Press into bottom of the prepared pan. Bake crust until golden, about 15 minutes. Cool crust completely on rack. Reduce oven temperature to 325 °.

Prepare the custard. In a medium heat proof bowl, whisk the egg yolks together. Mix together cream and 1/2 cup sugar and heat over low heat until just about to boil. Add about half the cream mixture to the egg yolks, whisking constantly, to temper them. Add the egg mixture back to the pan with the remaining cream and heat on low, continuing to whisk until just starting to thicken (don't overdo this because you'll get scrambled eggs); immediately remove from heat again and stir in the vanilla. Let the mixture cool slightly. (You can strain this mixture if you think any eggs curdled in the process)

Prepare the filling. Using electric mixer, beat cream cheese until very smooth. Add flour and beat until smooth. Gradually add the remaining 1 cup sugar and beat until smooth. Add whole eggs one at a time, beating just until blended. Slowly blend in the custard mixture until smooth.

Pour filling over crust in pan. Place the springform pan in a large roasting pan. Pour enough hot water into the roasting pan to come about halfway up the sides of the springform pan. Bake cheesecake until cake is almost set (the center will still move slightly when pan is gently shaken), about 1 hour and 15 minutes. Cool cake on rack for 1 hour. Refrigerate uncovered overnight.

About 30 minutes prior to serving, remove the cake from fridge and unmold. Sprinkle the top with sugar and use a blow torch to caramelize.

Just a few side notes:

  • A lot of folks are turned off by the whole water-bath thing and skip it. Please don't. I've made it both ways and when in the bath, they have never cracked (without it, the cakes always cracked)

  • Getting the cheesecake out of the water-bath can be tricky. I finally got some of those silicone oven mitts and those work great because they're water and heat proof!

  • To get nice clean cheesecake slices, have a large, tall pitcher full of very hot water and heat a large knife in it for a few minutes before serving. After each slice, wipe the knife clean with a paper towel and reheat in the hot water; wipe dry and make your next cut.
All the party-goers raved over this cheesecake and I thought it was pretty darn tasty, too (if I do say so myself ;-). Next time I make this I may skip the extra steps involved in making the custard and just dump all the ingredients into the mixing bowl and see how it turns out. I hope you get a chance to make this cheesecake and if you do, I'd love to hear what you thought, so please come back and comment or send me an email!

Wednesday, October 29, 2008

One of the wonderful things about blogging...

is the recognition from your peers that comes out of nowhere, just when you need it most! I have been so busy in my non-blog life that I really was wondering if I should be spending as much time as I have on my new hobby. Then, I received this award on Monday from Nancy at The Dogs Eat the Crumbs and it renewed my commitment to the blogging world.


Now, her blog is truly fantastic and she writes and cooks so well, it's a real honor to be thought of by her. So a heartfelt thank you, Nancy! Now I get to pay it forward to these great blogs (I think they've all have already gotten this award before, but I wanted them to know how much I enjoy them!):

Catilin of Engineer Baker

Honey B. of The Life and Loves of Grumpy's HoneyBunch

Jaime of My Baking Addiction

Clara of I Heart Cuppycakes

Lady Baker of Lisa is a Baker

*Here's the scoop on the award, and its rules:

  1. "This award was created in Uruguay by a fellow blogger who makes dolls exclusively from recycled materials. Her blog can be reached by clicking here. The rules for this award include the following: Pick 5 blogs that you consider deserve this award, creativity, design, interesting material, and also contributes to the blogger community, no matter of language.
  2. Advertise name of the author and also a link to his or her blog to be visited by everyone
    Each award-winner, has to show the award and put the name and link to the blog that has given her or him the award itself.
  3. Award-winner and the one who has given the prize has to show the link of “Arte y pico” blog, so everyone will know the origin of this award.
  4. Share these rules."

I certainly don't mind if you pass this on or not, like I said I just wanted to let you know how much I love reading your blogs! Have a great day :-)

Tuesday, October 28, 2008

TWD: Chocolate-Chocolate Cupcakes

I wish I didn't wait till the last minute to make all these blog-group recipes - it always seems like I'm making them the day before I've got to post. Unfortunately, I'm pretty short on time these days and I just can't seem to plan much past tomorrow, let alone a week from tomorrow. I would have loved to make a double batch of these cupcakes and bring them with me to a meeting scheduled for tonight (sorry Ladies, next time I'll try to plan ahead a little!).


As you can see, I got in touch with my inner Martha and went with the Halloween theme. I used some crushed oreos for the dirt (my three year old had lots of fun helping me dispose of all that leftover oreo middle stuff) and milano cookies for the gravestones. It would have been awfully fun to make a full-fledged graveyard had I made this a double batch!

I liked these cupcakes but I was expecting them to be really chocolaty. They're not. In fact, they've got a pretty light texture and are quite tender. I guess I thought that with a double "chocolate" in the title I was expecting them to be fudgier - I generally like a slightly denser cake like pound cake. (If that's what you like in a cupcake, I highly recommend Martha's One-Bowl Chocolate cake recipe - I've made it many times and it's wonderful and definitely on the "devil's food" side of chocolate cake.) Dorie gives a chocolate ganache "glaze" to frost her cupcakes with and works very nicely with the light chocolate flavor of the cupcakes. By the way - I wouldn't use that ganache with Martha's cupcake recipe, because oh my, would that be over-the-top (never mind that glass of milk, just chug straight from the gallon, you'd need it!)

I wish I had remembered to take pictures of the batter because my only note to you all would be not to worry about how thick it is. It's definitely more similar to muffin batter than cake batter. I had to stop and look over the recipe again just to make sure I had put in the right amount of buttermilk. Don't fret though, these cupcakes come out really nice and light.

Thanks Clara of I Heart Food4Thought for selecting this week's frightfully good recipe! Check out all the other wonderful TWD bakers here. These folks are so incredibly talented - it'll be fun to see how creative they got with the whole Halloween theme!

Next week: Rugelach - which I've never made but always wanted to try, so lucky me! I'm going to try really hard to stick all of these in the freezer and save them for Christmas - one less batch of cookies to squeeze in!
I haven't forgotten about posting that Creme Brulee Cheesecake either, just been busy, busy, busy. I'm hoping to post it Thursday (but don't hold me to that :-)

Thursday, October 23, 2008

Barefoot Thursday - Vegetable Pot Pie


This is the kind of recipe that makes me so glad I'm a part of Barefoot Bloggers. My family and I loved this dinner and I probably never would have made it without having had someone else choose it for me. It is a little on the time intensive side and uses a lot of bowls and pots - and I really wasn't sure how well the kids would like the fennel. In the end, it was one of those oh-so-worth-the-effort meals. This was simply delicious and so much a comfort-type food - nice and warm for our tummies on a chilly fall evening.

I ended up just making one large pot pie (in a 9x13 inch pan) and really didn't stray much from the recipe, except for the stuff I completely forgot to add: no cute little onions and no flat leaf parsley. Oh yes, and no saffron - it was nowhere to be found in my neck of the woods when I went shopping last week. I guess I'll have to order it from somewhere on the internet (and if any of you have a good site to do that from, please let me know!) or get some family member who lives in a bigger city (hellllooo Atlanta folks :-) to buy it for me. I didn't miss any of those things, however, as this pie tasted fantastic without them. The only thing I think I will try when I make this again is to cut down on the fat content a little by reducing the butter and omitting the heavy cream (eh, it was only three tablespoons - maybe I'll keep it in there...)


Vegetable Pot Pie from Barefoot Contessa Parties

12 tablespoons unsalted butter (1 1/2 sticks)
2 cups sliced yellow onions (2 onions)
1 fennel bulb, top and core removed, thinly sliced crosswise
1/2 cup all-purpose flour
2 1/2 cups good chicken stock
1 tablespoon Pernod (oops, forgot to mention I didn't use this either - I subbed 1/4 tsp anise extract)
Pinch saffron threads
1 1/2 teaspoons kosher salt
1/2 teaspoon freshly ground black pepper
3 tablespoons heavy cream
1 1/2 cups large-diced potatoes (1/2 pound)
1 1/2 cups asparagus tips
1 1/2 cups peeled, 3/4-inch-diced carrots (4 carrots)
1 1/2 cups peeled, 3/4-inch-diced butternut squash
1 1/2 cups frozen small whole onions (1/2 pound)
1/2 cup minced flat-leaf parsley
For the pastry:
3 cups all-purpose flour
1 1/2 teaspoons kosher salt
1 teaspoon baking powder
1/2 cup vegetable shortening
1/4 pound cold unsalted butter, diced
1/2 to 2/3 cup ice water
1 egg beaten with 1 tablespoon water, for egg wash
Flaked sea salt and cracked black pepper
Directions

  • Melt the butter in a large pot over medium heat. Add the onions and fennel and saute until translucent, 10 to 15 minutes. Add the flour, reduce the heat to low, and cook for 3 more minutes, stirring occasionally. Slowly add the stock, Pernod, saffron, salt, and pepper, and bring to a boil. Simmer for 5 more minutes, stirring occasionally. Add the heavy cream and season to taste. The sauce should be highly seasoned.

  • Cook the potatoes in boiling salted water for 10 minutes. Lift out with a sieve. Add the asparagus, carrots, and squash to the pot and cook in the boiling water for 5 minutes. Drain well. Add the potatoes, mixed vegetables, onions, and parsley to the sauce and mix well.

  • For the pastry, mix the flour, salt, and baking powder in the bowl of a food processor fitted with a metal blade. Add the shortening and butter and mix quickly with your fingers until each piece is coated with flour. Pulse 10 times, or until the fat is the size of peas. With the motor running, add the ice water; process only enough to moisten the dough and have it just come together. Dump the dough out onto a floured board and knead quickly into a ball. Wrap the dough in plastic and allow it to rest in the refrigerator for 30 minutes.

  • Preheat the oven to 375 degrees F.

  • Divide the filling equally among 4 ovenproof bowls. Divide the dough into quarters and roll each piece into an 8-inch circle. Brush the outside edges of each bowl with the egg wash, then place the dough on top. Trim the circle to 1/2-inch larger than the top of the bowl. Crimp the dough to fold over the sides, pressing it to make it stick. Brush the dough with egg wash and make 3 slits in the top. Sprinkle with sea salt and cracked pepper. Place on a baking sheet and bake for 1 hour, or until the top is golden brown and the filling is bubbling hot.

I really don't see how you would make 4 servings out of this - those would have to be some pretty large bowls. Like I said, I made this in a 9x13 pan and we had half of it left over (this after 2 grownups and 4 kids had their fill!). Yum - plenty for lunch for tomorrow!


Big thanks to Deb of Kahakai Kitchen for selecting this delectable dish. Be sure to check out how the other Barefoot Bloggers Vegetable Pot Pies turned out here.

Tuesday, October 21, 2008

TWD: Pumpkin Muffins

Boy, did that week fly by! And am I ever glad it did - the floors are beautiful, but it sure was a big job. My husband and his brother worked 14 hour days for 6 days to install and were such troopers, they even fought through colds to finish! Of course, the house was in complete and total chaos during that time, but I finally have my kitchen back and got a chance to make these wonderful muffins yesterday.
I decided to up the healthy-factor on these and so here are my substitutions:
  • Used 1 cup whole wheat and 1 cup AP flour
  • Added 1/2 cup whole oats
  • Decreased butter from 8 tablespoons to 4
  • Added the entire can of pumpkin (as opposed to 3/4 cup called for in the recipe) to increase the moisture content due to less butter and the addition of the oatmeal. I also did this because I hate to have that small amount of pumpkin left over in the can - I never want to throw it away, but never seem to use it up either.
  • Used regular raisins and omitted the nuts
  • Added an oatmeal crumb topping rather than the sunflower seeds (forgot to buy them!)

Crumb Topping

1/2 cup AP flour

1/2 cup whole oats

1/2 cup brown sugar

4 tablespoons melted butter

Mix together until large clumps form and crumble on top of the muffins.


One more change I made was to decrease the oven temperature to 350 ° (the recipe calls for 400 °). I'd like to tell you how long they were in there for, but I forgot to notice the time and so I just checked for doneness with a toothpick - but I would guess they were in there for 20 to 25 minutes.

These lightened muffins came out wonderfully moist and tasty. Even after they'd been sitting out for a while, the kids thoroughly enjoyed a pumpkin muffin after-school snack! This is definitely a keeper recipe. You can find it listed on Sounding My Barbaric Gulp - thanks for choosing such a fab recipe Kelly! Check out all the other Tuesday's with Dorie blogs here.

Next week: Chocolate, Chocolate Cupcakes!

Monday, October 13, 2008

Sorry gang, no TWD this week

Weeeelllll, my week hasn't gone exactly as planned and I'm pretty far behind. I'll have to take a pass on the Lenox Almond Biscotti and make it another time. Such a shame, as I really love homemade biscotti. Sigh. Be sure to check out my fellow Tuesdays with Dorie bloggers here and you can find the recipe at Canela & Comino (thanks for the pick Gretchen, and I'll be sure to make it sometime soon!)

It has been a great week, but filled with lots of time-consuming activities and little time to bake. I had a surprise party for one of my dearest friends on Friday night and made a Creme Brulee Cheesecake (inspired by Dorie, of course) which I must say, came out pretty darn good. I'll hopefully be able to post that later this week or early the next depending on how things go with the new floor. Yes, that's the primary item on this week's agenda and is taking precedence over just about everything else. My husband and his brother are installing hardwood throughout our first floor this week and while I am ecstatic to see my yucky, dated peach tile now sitting at the bottom of the dumpster, replacing it means that I won't have much access to the kitchen till next Sunday.


So no real food-blogging this week. Be sure to check back for the cheesecake though, it's definitely a keeper. Have a great week everyone!

Thursday, October 9, 2008

Barefoot Bloggers - Risotto


Well fellow Barefoot Bloggers, I owe you all an apology. I really did want to make this by following the recipe exactly as written because a. I love risotto and b. thought the butternut squash version would be fantastic. Things however, don't always work out as they ought.

It has been an absolutely crazy last two weeks for me and in hindsight, I wish I had waited to join BB until November when my commitments would ease off some and I could devote the proper amount of time and energy to the group. Not that I'm trying to make excuses or anything...but in addition, my whole family has been sick over the last week and while I fervently hoped I wouldn't come down with it, by Tuesday afternoon it had gotten to me too (okay, I guess I am making excuses).

Anyway, I did join Barefoot Bloggers, and this being only the second time to post with you all, I figured I needed to do something. I fully intended on making the risotto with butternut squash but I apparently had a total brain freeze when I went to the grocery store this past Tuesday and completely forgot to buy the ingredients for this recipe (I had a copy of it in my purse) - somehow I managed to buy $150 worth of other stuff, but alas....no squash, no Arborio rice, no shallots, no pancetta, no saffron, no fancy Parmesan. Sigh.

So, yesterday morning I decided I would make risotto anyway (in some shape or form) and post whatever I ended up with, figuring that making risotto from stuff you've already got in your pantry might provide someone out there in internet-land with the inspiration to try making it. So I had regular white rice, chicken broth, onions, white wine, grated parmesan cheese (yes, in the plastic container...sigh), and canned pumpkin. ::cringe:: Oh, I hope Ina never reads this.....

Before I ruined my batch of risotto with the canned pumpkin, I mixed a small amount on the side and taste-tested first.

In spite of everything, it actually came out alright and the two littlest ones and I had it for lunch. I know how vastly superior this would have tasted had I used the correct ingredients (especially roasted butternut squash and freshly grated Parmesano Reggiano cheese!) and I will try it again soon. The original, perfectly fantastic Ina Garten recipe is on Foodnetwork.com - but here's my mangled version (I only made half of this):

Butternut Squash Pumpkin Risotto

1 butternut squash (2 pounds) 1 15 oz. can pumpkin
2 tablespoons olive oil
Kosher salt and freshly ground black pepper
6 cups chicken stock, preferably homemade chicken broth
6 tablespoons (3/4 stick) unsalted butter
2 ounces pancetta, diced
1/2 cup minced shallots (2 large) minced onion
1 1/2 cups Arborio rice (10 ounces) white rice
1/2 cup dry white wine
1 teaspoon saffron threads
1 cup freshly grated Parmesan (Kraft parmesan works)

Directions
Preheat the oven to 400 degrees F.
Peel the butternut squash, remove the seeds, and cut it into 3/4-inch cubes. You should have about 6 cups. Place the squash on a sheet pan and toss it with the olive oil, 1 teaspoon salt, and 1/2 teaspoon pepper. Roast for 25 to 30 minutes, tossing once, until very tender. Set aside.


Meanwhile, heat the chicken stock broth in a small covered saucepan. Leave it on low heat to simmer.

In a heavy-bottomed pot or Dutch oven, melt the butter and saute the pancetta and shallots onions on medium-low heat for 10 minutes, until the onions are translucent but not browned. Add the rice and stir to coat the grains with butter. Add the wine and cook for 2 minutes. Add 2 full ladles of stock to the rice plus the saffron, 1 teaspoon salt (if your broth is salty, you might want to omit this, I did), and 1/2 teaspoon pepper. Stir, and simmer until the stock is absorbed, 5 to 10 minutes. Continue to add the stock, 2 ladles at a time, stirring every few minutes. Each time, cook until the mixture seems a little dry, then add more stock. Continue until the rice is cooked through, but still al dente, about 30 minutes total. Off the heat, add the roasted squash cubes canned pumpkin and Parmesan. Mix well and serve.

Check out the Barefoot Bloggers blogroll here to see how this recipe is done right and to see some truly fantastic photos. And I hereby solemnly promise to do better on the next recipe - Vegetable Pot Pie!
Update: My apologies to Rachel of Rachel Likes to Cook for not giving her the credit for selecting this fantastic recipe! I will do it justice someday Rachel, I promise!