Showing posts with label TWD. Show all posts

Tuesday, December 30, 2008

TWD: Tall and Creamy Cheesecake and an announcement

Hi everyone, I'm back! Sorry for the unannounced (and unanticipated) blogging vacation. I sure hope all of you had a wonderful Christmas - we sure did. It wasn't exactly peaceful (that's an impossibility with four children) but it certainly was joyful.

I have made my fair share of cheesecakes and even made some to sell this holiday season - and that's what I did with this one. A friend ordered a cheesecake for her family Christmas celebration this past Saturday, which was perfect timing for this week's TWD post. I have a couple of very good recipes from epicurious.com that I most frequently use. In fact, I used the topping from this one to create the cheesecake I made for my friend - Cranberry Orange Cheesecake with a Chocolate Crust.

Dorie's recipe comes together very easily, like most cheesecakes. I'm not sure why people find the prospect of making a cheesecake daunting, because, really it's pretty easy - the trickiest part is the water bath and I'm going to tell you the secret right now. When you're wrapping your springform pan in foil to go into the water bath, you must use the large heavy duty foil (18 inches wide). If you use anything smaller, the water will seep into the pan and turn your crust into mush (I speak from experience here). Wrap the pan at least twice, making sure to mold each foil layer upwards towards the top of the pan (not folding it sideways) - you may have to roll the top of the foil around the top edge.


Another tip: when you fill your roasting pan, make sure to put the pan in first, then fill it with hot water (no more than halfway up the side of the pan).


To make a chocolate crust, I just used 1 3/4 cups of crushed oreos (stuff removed - this is much to the delight of my children who make super stuffed oreos).


You can buy plain chocolate wafer cookies - Meijer doesn't carry them here though and they're usually more expensive than oreos (plus, no stuff). Anyway, I omitted the additional sugar and just stirred in the melted butter.

The only other change I made to the original recipe was to add 2 tsp. grated orange zest to the batter and add the topping. Here's that recipe:

1/2 cup sugar
3 tablespoons water
1 teaspoon cornstarch dissolved in 1 tablespoon water
2 cups fresh cranberries
1/2 teaspoon grated orange peel

Stir sugar and water in medium saucepan over medium-low heat until sugar dissolves. Increase heat to medium; add cornstarch mixture and bring to simmer. Add cranberries; cook until beginning to pop, stirring often, about 3 minutes. Stir in orange peel. Cool completely. Cover and chill overnight. (Cheesecake and cranberry mixture can be made 2 days ahead. Keep refrigerated.)

Run knife around top edge of cheesecake to loosen. Release pan sides. Top cheesecake with cranberry mixture. Chill until set, about 1 hour.

My announcement is sort of a sad one to make - this will be my last Tuesdays with Dorie post. Unfortunately, Dorie's baked goods aren't calorie free and I really want to focus on losing 30 pounds next year. I thought that training for a half marathon would do the trick, but alas, no. At least I didn't gain any weight! I have had such a great time since I joined and I am so thankful for all my new blogging friends I met through TWD.

In 2009 I am going to try to post healthy recipes which will be lower in fat and sugar, but every once in a while, I'm going to have to sneak in something truly decadent (and there's really not many better sources out there than Baking From My Home to Yours by Dorie). Thanks to all my TWD buddies for all your support and I'll be sure to check in with you each Tuesday!

Have a happy and safe New Year!
UPDATE: It's been too long since I last posted a TWD - I completely forgot to link to the wonderful blogger who choose this week's recipe. Please visit Anne of Annestrawberry for the recipe and to check out a truly fantastic blog!

Tuesday, December 9, 2008

TWD: Grandma’s All-Occasion Sugar Cookies

Please accept my apologies for the light blogging lately. Like all of you, we are busy, busy, busy right now and blogging has sort of taken a back seat. So, sorry - I am hoping that I'll be able to get back into the swing of things after the holidays (and then after a short break for the Disney half marathon and vacation in January).


These cookies are a snap to make and are a good all-around sugar cookie. They are a little on the crisp side, but if you watch them really carefully and take them out just before they start to brown, you can have them a little crisp on the outside and chewy on the inside (which seems to be just the right texture to me). I have to admit that they don't quite measure up to my all-time favorite sugar cookie recipe though - Cream Cheese Icebox Cookies from the Joy of Cooking. These are simply outstanding - the dough is great to work with and the addition of the cream cheese just makes them taste fantastic. I also usually use the Quick White Icing II recipe from the same book and it's always a hit (watch this very carefully as it heats - don't overheat it or it'll crystallize on you). Since this was the kids' chance to get in touch with their inner artist (and taste isn't a huge factor), I went with Betty Crocker's icing bags this time.


I let the kids go to town with the frosting and sprinkles. Isn't it amazing how children have the ability to cover almost every square millimeter of the top of the cookie with stuff - that my friends, is pure kid talent. This is my three year old's creation:


For Dorie's recipe, check out the Küchenlatein blog (I think it's German, but she's got a translator function) - thanks Ulrike for choosing this week's recipe and giving my kids the opportunity to make a pretty good sized mess and get a nice sugar rush all in the span on 15 minutes :-) As usual, you can check out all the other supremely talented TWD bloggers here.

Tuesday, December 2, 2008

TWD: Linzer Sables


It's the most wonderful time of the year again folks! Welcome to the Christmas season - well, actually according to Catholic tradition, it's only Advent, and Christmas is from Dec. 25th through Jan. 5th, but I digress.... Anyway, Tuesdays with Dorie starts off the season with, what else, cookies! They're beautiful cookies too - or they could be if you remember to make a cutout in the center of the cookie (making a window into the delightful raspberry jam filling). As you can see, I completely forgot to do this, but I still think they're pretty. And feel free to judge this book by it's cover - they're delicious!

The recipe is very easy - don't be intimidated by rolling out the dough. It rolled out like a dream and, since you roll it between two sheets of plastic wrap, clean up is a cinch. I only made one change to this recipe and that's to substitute 1 can of almond paste for the ground almonds and sugar. I thought I had plenty of almonds stored away in the freezer and only at the last minute realized I didn't have any. Thankfully, I had bought a can of the almond paste a couple of months ago intending to make another batch of almond horns (still intending to do that - maybe later this month). This substitution worked great, but I had to rearrange the directions a little to compensate, so I'm reprinting the recipe with my changes.

Linzer Sables
adapted from Baking From My Home to Yours by Dorie Greenspan

1 8 oz. can Almond Paste
1 1/2 cups flour
1 1/2 tsps ground cinnamon
1/4 tsp salt
scant 1/4 tsp ground cloves
1 large egg 2 tsp water
1 stick unsalted butter, room temperature
1/2 cup raspberry jam

Working with a stand mixer fitted with the paddle attachment, blend almond paste and butter together until smooth, maybe 3 minutes at medium-low speed, scraping down the sides as needed. Reduce speed to low and add in the ground cinnamon, cloves and salt. Add in the egg and water, beat another 2 minutes. Add the flour, mixing only until just combined - don't over mix.

Divide the dough in half. Working with one half at a time, put the dough between two large sheets of plastic wrap. Using your hands, flatten the dough into a disk, then grab a rolling pin and roll out the dough, turning it over frequently so the paper doesn't cut into it (I did not do this and it wasn't a problem - I used plastic wrap though) until it is about 1/4 inch thick. Leave the dough in the paper and repeat with the second half of the dough. Transfer wrapped dough to a baking sheet and refrigerate or freeze until it is very firm, about 2 hours in the fridge or about 45 minutes in the freezer. The rolled-out dough can be wrapped airtight and stored in the refrigerator for up to 3 days or in the freezer for up to 2 months. Just thaw the dough enough to cut out the cookies and go on from there.


Getting Ready to Bake: Center a rack in the oven and preheat to 375°. Line 2 baking sheets with parchment or silicone mats.

Peel off the top sheet of wax paper or plastic wrap from one piece of dough and, using a 2-inch round cookie cutter - a scalloped cutter is nice for these - cut out as many cookies as you can. If you want a peekaboo cutout, use the end of a piping tip to cut out a very small circle from the centers of half the cookies. Transfer the rounds to the baking sheets, leaving a little space between the cookies. Repeat with second disk of dough. Set the scarps aside - you can combine them with the scraps from the second disk and roll and cut more cookies (refrigerate the rolled out disk as before).

Bake the cookies one sheet at a time (I didn't - I put them both in the oven and switched them halfway through baking and they came out great) for 11 to 13 minutes, or until the cookies are lightly golden, dry and just firm to the touch. Transfer to a rack to cool to room temperature.

To make sandwich cookies, spread jam on one side of the cookies and top with another cookie. Dorie's recipe is a little different her in that she melts the jam with some water and boils it slightly, but again, mine came out fine just using the straight jam. One final note, the recipe says it makes 50 cookies (or 25 sandwich cookies) - I didn't even come close to that as I only got about 16, but I don't think I rolled out my dough as thin as a quarter of an inch either.

I definitely recommend this cookie and think it'll look great in your holiday assortment, especially if you use a Christmas themed cookie cutter. I tried using my star-shaped cutter, but the tips kept breaking off so, in order to keep my stress level down and avoid that Mommy's-really-irritated-so-don't-mess-with-her atmosphere in the kitchen, I went with the scalloped edge cutter. (My kids know first hand that expression "If Mama ain't happy, ain't nobody happy" and have started to recognize the warning signs)


Many thanks to noskos of Living the Life for selecting a cookie that's as beautiful as it is tasty (you can find the original recipe there)! Like I said, I don't know if I'd classify my Linzer Sables as beautiful, but not bad. Dorie's are in the book and I'm sure plenty of other TWD bakers' have gorgeous cookies - so check 'em out!

Coming up next Tuesday: Grandma’s All-Occasion Sugar Cookies (we'll be breaking out the Christmas sprinkles for sure!)


Tuesday, November 25, 2008

TWD: Thanksgiving Twofer Pie

If you're short on time this Thanksgiving (and really, who isn't), this pie may be just the thing for you - two pies for the price of one! This week's recipe was selected by Vibi of La casserole carrée (another French-Canadian blog! Don't worry about trying to read it with your high-school-French-class-only-level French language abilities, she's got Google Translate) - thanks for choosing such a perfect recipe for this week Vibi!

It's very easy to put together, especially if you buy a Pillsbury ready to use pie crust. Yep, that's right - I pulled a Sandra Lee and I used a store-bought pie crusts to make my "semi-homemade" twofer pies. For those of you who know me, you know what a monumental announcement this is - I never, ever, under almost any circumstance use refrigerated pie dough. You see, I am a bit particular when it comes to pie crusts because they are my favorite part of the pie. My husband calls me a food snob, whatever. I prefer to think of myself as highly selective - I just know what I like, and homemade pie crust is, IMHO the only way to go. With a single exception - time. Or, more specifically, the lack there of. I don't mean to keep harping on this, because I know everyone is busy, but (as usual) I have over-committed and have just simply started to run out of time. I think I have the word "sucker" tattooed across my forehead, so please do me a favor and don't ask me to sign up to help with anything because I am just incapable of saying no.

At any rate, I ended up making two of these twofer pies for my church bake sale a week or so ago. Unfortunately, this meant that I personally don't know how they tasted, but I was told that they sold right away and the Women's Club earned some money for them, so I'm happy with that. I sure hope whoever bought them enjoyed them!
Here's my little 3 year old helping with the pumpkin pie part of the recipe (as a side note - don't you love all that stuff all over the counter - I'm surprised I found room for the dang food processor!).


The recipe calls for mixing the ingredients for the pecan pie filling together, then spinkling the pecans on the pumpkin layer already in the pie pan and then pouring the filling on last. I messed up and mixed the pecans in with the filling and just spread it over the pumkin - turned out just fine.


The final product:

Can't wait to hear how the other TWD bakers liked this pie - you can check them out here.

Lots and lots of cookies are scheduled for next month, including Linzer Sables which are on tap for next Tuesday!

Tuesday, November 18, 2008

TWD: Arborio Rice Pudding, Black, White (or both)


I chose the "both option" since I knew I was going to have to double the recipe anyway to satisfy my family of sweet-tooths. I was eagerly anticipating this recipe because I haven't ever made rice pudding, and hadn't even eaten it since I was oh, about twelve years old. My Mom made it for us occasionally when we were growing up, but I haven't had the opportunity to have it since. On the surface, this recipe looks extremely easy, with only a handful of ingredients even if you include the chocolate. But, as I'm sure you are aware, looks can be deceiving.

I made one change from the recipe because I wanted to and another change because I had to. For the first, I decided that I would make the "white" part white chocolate as opposed to just a simple vanilla. I was frankly surprised that this wasn't what Dorie had originally in mind when she wrote this recipe (just seemed to make sense in that the "black" part was to be chocolate). As for the necessary change, read on.

When I read over the recipe, the thought of only using a measly 1/4 cup of rice to 3 1/4 cups of milk was unsettling. I wondered if it might be a misprint, but I went ahead and trusted that Dorie knew what she was talking about. I wish I had read the comments over at the Tuesdays with Dorie site first (I will remember to do that from now on as it is always full of great advice). Suffice to say, my pudding didn't quite come out right.

The recipe says to parboil the rice for 10 minutes and then cook it in the milk and sugar mixture for 30 minutes until 80-90% of the milk had been absorbed. After 30 minutes of simmering, it tasted delicious but looked nothing like rice pudding and everything like rice soup. The rice was tender and I just thought there was no way it was going to soak up that much milk. I added white chocolate to half and bittersweet to the other half and covered them with the skin-preventing plastic wrap. By this point, it was getting late so just I threw it in the fridge for an overnight stint and hoped fervently that things would set up. Alas, this was not the case. In the morning I simply had cold rice soup.


By now, you'd think that I would have remembered to go to the TWD site to figure out what was going on, but no, I didn't. My necessary recipe change was to put each batch back into a pot and add some cornstarch (2 tbsp per pot) to thicken them (bring to a boil and cook for an additional minute). This worked like a charm but kind of diluted the flavor. Of course, it was after this additional step that I consulted my fellow TWD bakers and discovered what I did wrong. Although the recipe calls for 30 minutes of simmering, many others found that if allowed to simmer another 15 to 30 minutes more, the pudding thickened nicely.


All in all, I have to say that this rice pudding was pretty tasty, despite my doctoring with the cornstarch. The white chocolate was far and away my favorite of the two and I'll definitely be making it again and next time, I'll try to be more patient. Thanks Isabelle of Les gourmandises d’Isa (a French food blog - oh, la, la tres magnific!) for choosing this delicious recipe. Check out the other TWD bakers here.

Be sure to check in next week for Thanksgiving Twofer Pie!

Tuesday, November 11, 2008

Back to food blogging! TWD: Kugelhopf

I was intrigued when I first read that Kugelhopf would be our recipe this week - sounds really different, doesn't it? Really, it's just a kind of brioche (egg and butter, mildly sweet bread) and, well, to be totally honest, I didn't really think a whole lot of it after the taste test. It was good, but nothing to write home about, especially for all the steps involved in making it. Boy, I feel terrible writing that. It makes me wonder if I didn't do something right - which, after looking at it once it came out of the oven, makes that possibility more likely (note the concave bottom of those slices).

Anyway, here's how it came together:

The dough after the first addition of liquid (warm milk and yeast).


Yeah, that's exactly what I thought: "Huh? What the heck is that?" Dorie describes this look of the dough "shaggy". I've made quite a bit of bread but that was a new one for me, but that's a pretty accurate description.

After the addition of the eggs and butter however, the dough got very smooth and was actually pretty wet.


The boys had fun helping me out with this recipe (well eyeing the potential goodness, anyway), especially my littlest one - he really enjoyed watching my not-so-sturdy old Kitchen Aid work so hard to mix the dough.

Here he is helping to hold that crazy thing down! At any speed above 3, it really starts to wobble and kinda inches its way all over the counter.


My blogging friend Cathy over at The Tortefeasor is asking for kitchen goodies from Santa, I think I need to hop on that bandwagon too! Surely the big guy reads blogs - right Cathy?

I went looking for a Kugelhopf pan at our kitchen store in the mall and they didn't have one. So, not wanting to drag a tired 15 month old over to Bed Bath and Beyond, I just used the standby bundt pan (don't read anything into that Santa - just the new mixer would be great!).

After refrigerating the dough overnight, it actually rose faster than I expected - only two hours, but that was in a slightly warmed oven.


And, ta da - here's how it looked fresh out of the oven. Yeah, not quite right. Not sure what I did wrong, but Dorie says that the dough might rise up over the top of the pan once in the oven, but obviously, that wasn't a problem for my little Kugelhopf.


It looked much better unmolded with a fine dusting of powdered sugar:

So bottom line, if I were to make this again, which is doubtful, I would skip a lot of those middle rises and just do one rise overnight in the fridge, cook it in the morning and serve it at a brunch. You can find the recipe over at The All-Purpose Girl (thanks, Yolanda - I hope yours turned out better than mine!) and you can check out all the other fabulous Tuesdays with Dorie bakers here.

Next week's recipe sounds equally intriguing, but I'm hoping for better results: Black, White (or both) Arborio Rice Pudding

Tuesday, November 4, 2008

TWD: Rugelach - better late than never

Just a quick post today. As usual, I waited until the last minute to make these and ran into family issues last night while waiting for the dough to chill. My 10 year had to make amends with her best friend and so we pulled out the Easy-Bake oven, made her a sugar cookie and my daughter and I delivered it (with a long note of apology). Problem solved, best friends again, all is right with the world.


So we rescued the friendship, but I didn't get around to finishing the Rugelach until today.


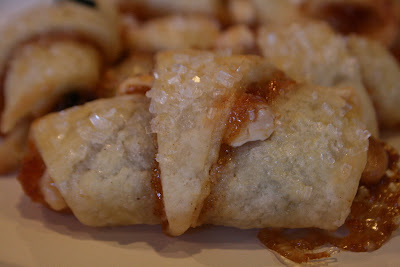
I used apricot preserves, dried cherries and white chocolate chips to make these and the flavors came together beautifully. In the recipe, Dorie suggests cutting the rolled out dough into 4 squares and cutting those into triangles. I just ended up cutting it up like a pizza and ended up with 12 slices for each round of dough - so only 24 cookies. I didn't think these were extra large, but maybe my eyes, and tummy, like the bigger size (I'm guessing my hips won't like these larger rugelach though :-)


I was successful in stowing these in the freezer (except for the one I had for purely R&D purposes, of course) and plan on pulling them out for Christmas. Check out Piggy's Cooking Journal for the recipe and be sure to check on all the other TWD bakers here.

Tuesday, October 28, 2008

TWD: Chocolate-Chocolate Cupcakes

I wish I didn't wait till the last minute to make all these blog-group recipes - it always seems like I'm making them the day before I've got to post. Unfortunately, I'm pretty short on time these days and I just can't seem to plan much past tomorrow, let alone a week from tomorrow. I would have loved to make a double batch of these cupcakes and bring them with me to a meeting scheduled for tonight (sorry Ladies, next time I'll try to plan ahead a little!).


As you can see, I got in touch with my inner Martha and went with the Halloween theme. I used some crushed oreos for the dirt (my three year old had lots of fun helping me dispose of all that leftover oreo middle stuff) and milano cookies for the gravestones. It would have been awfully fun to make a full-fledged graveyard had I made this a double batch!

I liked these cupcakes but I was expecting them to be really chocolaty. They're not. In fact, they've got a pretty light texture and are quite tender. I guess I thought that with a double "chocolate" in the title I was expecting them to be fudgier - I generally like a slightly denser cake like pound cake. (If that's what you like in a cupcake, I highly recommend Martha's One-Bowl Chocolate cake recipe - I've made it many times and it's wonderful and definitely on the "devil's food" side of chocolate cake.) Dorie gives a chocolate ganache "glaze" to frost her cupcakes with and works very nicely with the light chocolate flavor of the cupcakes. By the way - I wouldn't use that ganache with Martha's cupcake recipe, because oh my, would that be over-the-top (never mind that glass of milk, just chug straight from the gallon, you'd need it!)

I wish I had remembered to take pictures of the batter because my only note to you all would be not to worry about how thick it is. It's definitely more similar to muffin batter than cake batter. I had to stop and look over the recipe again just to make sure I had put in the right amount of buttermilk. Don't fret though, these cupcakes come out really nice and light.

Thanks Clara of I Heart Food4Thought for selecting this week's frightfully good recipe! Check out all the other wonderful TWD bakers here. These folks are so incredibly talented - it'll be fun to see how creative they got with the whole Halloween theme!

Next week: Rugelach - which I've never made but always wanted to try, so lucky me! I'm going to try really hard to stick all of these in the freezer and save them for Christmas - one less batch of cookies to squeeze in!
I haven't forgotten about posting that Creme Brulee Cheesecake either, just been busy, busy, busy. I'm hoping to post it Thursday (but don't hold me to that :-)

Tuesday, October 21, 2008

TWD: Pumpkin Muffins

Boy, did that week fly by! And am I ever glad it did - the floors are beautiful, but it sure was a big job. My husband and his brother worked 14 hour days for 6 days to install and were such troopers, they even fought through colds to finish! Of course, the house was in complete and total chaos during that time, but I finally have my kitchen back and got a chance to make these wonderful muffins yesterday.
I decided to up the healthy-factor on these and so here are my substitutions:
  • Used 1 cup whole wheat and 1 cup AP flour
  • Added 1/2 cup whole oats
  • Decreased butter from 8 tablespoons to 4
  • Added the entire can of pumpkin (as opposed to 3/4 cup called for in the recipe) to increase the moisture content due to less butter and the addition of the oatmeal. I also did this because I hate to have that small amount of pumpkin left over in the can - I never want to throw it away, but never seem to use it up either.
  • Used regular raisins and omitted the nuts
  • Added an oatmeal crumb topping rather than the sunflower seeds (forgot to buy them!)

Crumb Topping

1/2 cup AP flour

1/2 cup whole oats

1/2 cup brown sugar

4 tablespoons melted butter

Mix together until large clumps form and crumble on top of the muffins.


One more change I made was to decrease the oven temperature to 350 ° (the recipe calls for 400 °). I'd like to tell you how long they were in there for, but I forgot to notice the time and so I just checked for doneness with a toothpick - but I would guess they were in there for 20 to 25 minutes.

These lightened muffins came out wonderfully moist and tasty. Even after they'd been sitting out for a while, the kids thoroughly enjoyed a pumpkin muffin after-school snack! This is definitely a keeper recipe. You can find it listed on Sounding My Barbaric Gulp - thanks for choosing such a fab recipe Kelly! Check out all the other Tuesday's with Dorie blogs here.

Next week: Chocolate, Chocolate Cupcakes!

Tuesday, October 7, 2008

TWD: Caramel-Peanut Topped Brownie Cake


In the book, this cake looks absolutely mouth-watering. I was expecting it to taste a lot like a peanut butter parfait from DQ (especially because I planned on serving it with ice cream) which is my very favorite treat from that place. It didn't, but was still very good. I don't mean to sound like this wasn't delicious, because it was, but I guess Creme Brulee is an extremely tough act to follow.

Overall, the consensus at my house was that the brownie cake was great but the caramel was too chewy.


I think if it had been more saucy rather than chewy, it would have been really outstanding. I recommend adding more cream and butter - maybe 1/2 of cream and another tablespoon or two of butter to the caramel. Also, my cake really sank in the middle and created quite the crater.


Dorie warns against this in her book and says that it's okay, but I still think mine sank more than was supposed to and I'm not sure why. Maybe the dark pan caused the outside edges to cook faster? Anyway, all my caramel and peanuts sat well inside the crater and just didn't look quite as nice.

Speaking of caramel, it's not that difficult to make, especially Dorie's recipe which calls for corn syrup (for some technical chemistry-type reason, the corn syrup helps to prevent the sugar from re-crystallizing after you start to heat it up - I think this is true for almost any time you're cooking sugar to make candy). I would add a couple of notes to this recipe:

  • Make sure to wash down the sides of your pan with water (using a pastry brush) before you start cooking the sugar - this also helps to prevent re-crystallization)


  • Really keep a close eye on your caramel as soon as it turns amber in color - it'll get dark on you fast and scorch easily (this means do not leave the stove for any reason other than danger to life and limb of one your children - trust me, I've burned a lot of sugar).


So, when I make this again, I'll be making a saucier caramel and I'll probably try roasting some pecans in place of the peanuts. Thanks to Tammy of Wee Treats by Tammy for choosing this week's recipe (which should be posted on her site) and of course, you can check out all the other fabulous Tuesdays with Dorie bakers here.
On deck for next week: Lenox Almond Biscotti!

Tuesday, September 30, 2008

TWD: Creme Brulee...oh.my.

Let me just start out by saying that this is one of the best desserts I have ever made. Yes, ever.


I was so excited to make this week's Tuesday's With Dorie selection because I have never made Creme Brulee before and it looks absolutely delicious in the book. Why oh why did I never make this before? Who knows - I as sure the heck don't and I'm still asking myself why. Maybe it was the lack of a torch (really, a weak excuse because the husband loves any reason to get a new tool and I could have just asked him to get one a long time ago) or maybe, I was just a wee bit intimidated. I mean this is such a classic and classy dessert. After having finally made Creme Brulee, however, I can say with full authority that this excuse should never hold you back - it's incredibly easy to make. In fact, after I had made the custard and had them in the oven I thought, "that's it? That's all there is to this fancy-schmancy dessert?" Three eggs, some sugar, cream, milk and vanilla. Bake it, sprinkle it with sugar, put a torch to it. That's it.

Simple. Beautiful.


Divine.


I went straight ahead with the recipe as listed in the book, full fat and all. I thought since this was my first attempt at Creme Brulee I'd better start with the basics. There will most definitely be time for experimentation later. Dorie lists several variations to try and I'm sure many of my fellow TWD bakers got creative (check out the blogroll here).
I only have two suggestions:

  • The recommended cooking time was 50 to 60 minutes. I had mine in the oven for 75 and they were still a little wobbly, but after their time in the fridge they had set up nicely. Maybe this depends on the dishes you use - I used ramekins which were about 1 1/2 inches high by 3 inches in diameter. For thise recipe, I filled 4 rams plus an extra, larger bowl).

  • If you've got a three year old in your house, get her a spoon before you give her the bowl. I had just given her the Creme Brulee and when I turned to give her a spoon, she already had her tongue broken through the sugar.

My 8 year old son, who is already a man of few words said simply, but emphatically "Make this again" (we're still working on the please and thank you thing). My 10 year old daughter actually licked the bowl clean and begged to eat Daddy's (which did not happen). The baby grabbed the spoon from me and demanded to eat it by himself (which also did not happen, as we were sharing). End result, five empty dishes in record time. Delicious!

It was also a lot of fun for the kids to watch the caramelization process (science in the kitchen - such fun!). We didn't even make it back to the table to eat these - just stood around the counter devouring them.

Thank you, thank you Mari of Mevrouw Cupcake for selecting this fabulous recipe! Save some drool for next week though because coming up is Caramel-Peanut-Topped Brownie Cake.

Tuesday, September 23, 2008

TWD: Dimply Plum Cake


I'm not real happy with this photo - I had lost all the natural light by the time the cake was ready to be cut (and I haven't learned enough about my new camera to figure out how to compensate). It looks wonderful in the book, however, and I knew the flavors of plums, cardamom and orange would come together beautifully. The recipe calls for ground cardamom and I was pretty sure I had bought some cardamom seeds for some recipe I made ages ago (and I'm thinking at least 5 years or so). As I'm sure most of you foodies out there are aware, there is some sort of statute of limitations on how long spices hold their flavor. I don't have any idea as to how long that may be because I keep them around despite this "rule" and they always seem just fine to me. Case in point, my cardamom seeds - after I unearthed the jar from the deepest darkest reaches of my spice cabinet - were still incredibly fragrant. The only challenge was to grind them up to put in the cake. I'm sure you all have received gifts from people and wondered "when the heck am I ever going to use this" and consider pulling a classic Seinfeld "re-gift"? Well, might I suggest you rethink that strategy in the future - you never know when that gift might come in handy. From another deep, dark corner of the same cabinet, I pulled out a gift I've had for years and never used: a mortar and pestle set and it worked like a charm for the task at hand:


All I ended up having to buy for the recipe was one orange and the plums (which were on sale this week - Prudy would be so proud!).


This made for a pleasant change over the cost of the last TWD which was filled with lots of delicious, but expensive chocolates (white, semi-sweet, bittersweet you name it!). As a side note, you really, really must make those cookies, they were divine - just make sure to have a glass of milk on hand to accompany them, they're pretty rich.

This cake came together very easily as Dorie follows a pretty straightforward cake baking protocol. I have to tell you that before I even I got this cake in the oven, the house smelled amazing - cardamom has an exotic, but somehow at the same time homey, fragrance that's hard to describe (as if that weren't obvious from the oxymoron I just wrote, sheesh...).

The cake looks lovely with all the plums on top doesn't it? The recipe calls for 8 plums, but I could only smoosh 7 into my 8x8 pan, and that's only after I quartered the seventh one.


Dorie says to bake this for 40 minutes, but at 40, the knife I used to check it with came out fully coated in batter. I left it in for 5 more minutes, but it probably could have used more. Unfortunately, the tops were getting quite brown and I didn't want to risk drying out the edges. As a result, the middle pieces were a little underdone. I wonder if this was because my plums may still have been cold from the fridge when I placed them on top of the batter? My advice would be to let your fruit come to room temp before making this.

My girls really liked this cake the night I made it and ate it while it was still warm. I think I actually liked it better the following morning after the flavors of the orange and cardamom really came together.
A question for my fellow TWDers out there - can anyone tell me why Dorie calls this cake "Dimply"? I've just been wondering since I read the recipe. Is it the plums - do they have a dimple? Sorry, maybe I'm just clueless on this one.

Thanks to Michelle of Bake-en for selecting this week's recipe. My take on this is that it's a great breakfasty-type cake which is quite nice with a cup of coffee and a friend :-)